That is considered one of my favourite group initiatives in a very long time! As soon as I received began on this straightforward DIY, I could not wait to get began on the following drawer.
This is not a troublesome venture in any respect, and the one “actual” instrument you will want for this venture is a miter noticed. You can use a miter field and handheld noticed, it would simply take longer. There are quite a bit of cuts wanted for these customized dividers!
This can be a improbable technique to make customized drawer dividers that work completely for you and your loved ones’s wants!
For this venture, you will need to use skinny wooden — it is cheap, straightforward to chop and would not take up a lot area within the drawers.
I just like the three inch measurement (truly 2.75 inches), as a result of they’re the precise depth of our kitchen drawers:

This publish could comprise affiliate hyperlinks in your comfort.
I could earn a small fee when you make a purchase order by way of hyperlinks.
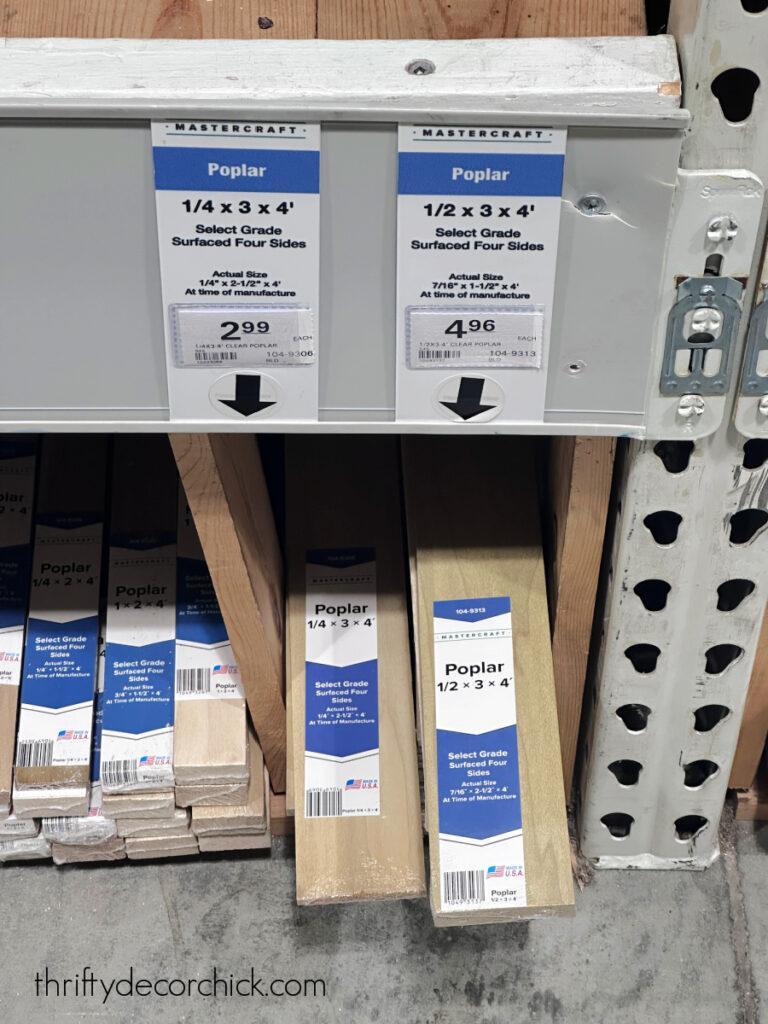
I’ve discovered these explicit boards at each House Depot and Menards (pictured above) — I can not discover any within the quarter inch thickness at Lowe’s.
Each choices are product of Poplar — the Menard’s wooden comes wrapped in plastic and typically is barely higher and extra constant high quality:

Make sure that to examine the peak of your drawers earlier than deciding in your boards.
(I saved that trim for some taller dresser drawers I would like to do that identical DIY on!)

Treating the wooden is not obligatory, however will assist to forestall cracks over time and the absorption of any spills.
I have been engaged on these over the previous few weeks and completed up the final drawer as we speak — my husband’s espresso drawer (and my sizzling chocolate provide):

I eliminated every part earlier than beginning, and cleaned the drawer properly. I additionally took benefit of this course of to do some purging whereas I used to be at it.
If wanted, I reorganized the objects earlier than reducing any wooden. You possibly can regulate the structure a bit as you go, however I did not need to waste any wooden.
The entire concept behind this DIY is to create stress in order that your boards maintain every part along with a decent match.
I reduce quite a few strips of wooden to create my sections, and tried out the objects I wished to retailer inside every to ensure there can be sufficient room:

That is the enjoyable half that I totally loved — every bit is part of the puzzle. So for this primary part, I reduce two boards at 4.75 inches as the perimeters.

I moved on to the following part, adjusting the size of every reduce as wanted:

That is the greatest half about these customized drawer organizers — you can also make every drawer work in your wants particularly.
Once you get to the tip, you will need the cuts to be as exact as potential so every part stays put. I erred on making the ultimate cuts simply barely longer than wanted so they might match as tightly as potential.
As you fill in every slot on the finish of your row, the entire thing turns into extremely safe — they will not budge!
In my expertise, you need these remaining two items to be tight, however not so tight that you must hammer them into place. (You do not need to stretch out or put stress in your drawer joints over time.)
As a result of the espresso pod organizer is thick foam, it supplied loads of stress and the sections alongside the suitable do not transfer:

The drawers wanted that stress each entrance to again and facet to facet as I created the sections, so the previous couple of cuts are an important.
Here is a earlier than of our utensil drawer — we had a retailer purchased insert for years, nevertheless it continually opened up with the motion of the drawer:

We additionally could not make the most of ALL of the area within the drawer. It was solely an inch or so alongside the again, however I wished to make use of it! 🙂

SO a lot better! I LOVE that every part stays completely in place and would not slide round.
Years in the past I shared these expandable drawer dividers. I cherished them at first:

However over time, I wished to chuck the out the window…they drove me loopy. They misplaced all stress and simply wouldn’t keep put anymore.
These dividers are what made me consider this concept, so I am grateful for them in the long run. 🙂
The drawer on the left is that very same one now, so a lot better!:

My favourite drawer (sure, I’ve a favourite) was our junk drawer. I’ll say, it was fairly properly organized earlier than. I believe I received these felt containers at Ikea:

But it surely was killing me that this drawer did not match the others, so it needed to occur:

I imply, this can be a factor of magnificence!!

Every drawer took one to 2 4 foot boards, so round $6 every. It is onerous to discover a retailer purchased choice for that value, particularly with this practice element!
By my third drawer, I used to be knocking each out in about half-hour.
We are able to nonetheless simply take away the items for changes or cleansing. And if wanted, I can change the configuration in just some minutes with just a few new items.
This DIY undoubtedly scratched an itch — not solely do we have now fantastic customized drawer storage, nevertheless it was enjoyable for me to create each. The method will not be everybody’s cup of tea, however I promise you will benefit from the finish outcome! 😂