In our first residence, we had no window trim in any respect, so I added this Craftsman-style molding round most of our home windows in that home. I am sharing that tutorial right here, and an easier model as nicely.
First up, the easier model that works if you have already got casing round your home windows, however need to beef it up a bit.
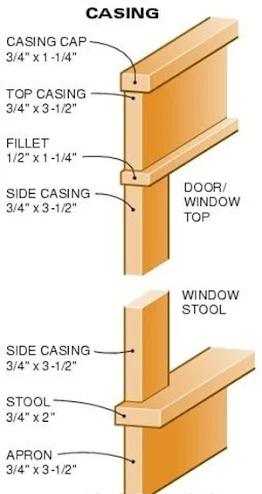
Earlier than we begin, here is a useful diagram of such a casing round a window:

You possibly can see right here how easy it’s actually…and should you’re beginning with present trim it is even simpler!
Tutorial #1: Including to present window trim.
I have been engaged on some updates in our mud/laundry room, and I figured I might beef up the window trim on this room whereas I used to be at it:

This submit could include affiliate hyperlinks to your comfort.
I could earn a small fee when you make a purchase order by way of hyperlinks.
It is a earlier than earlier than pic of the room, nevertheless it’s one of the best I’ve of this window.
The great thing about this model of the tutorial is I solely needed to deal with the highest and backside of the window — no have to take away the casing on the perimeters.
To take away the apron, make sure that to attain the caulk across the trim first — then faucet a flat painter’s instrument or a crow bar underneath the trim to begin pulling it away from the wall:

You may most likely have some lengthy nails nonetheless intact — you’ll be able to pull these out, or simply do as I do and hammer them into the drywall:

Be sure that they’re absolutely pounded into the drywall and never popping up in any respect. You may need to take away any residual caulk leftover as nicely.
I take advantage of a easy 1×4 primed piece of wooden for the brand new apron:

That is it!
The topper of the window trim is made up of three items of trim — skinny lattice molding, a 1×2 and a 1×4:

Through the years I’ve additionally used a trim piece known as “cease” for the underside portion. Each work nice, the lattice is only a bit cheaper.
I prefer to construct and paint this portion off the wall — it is simply simpler than of up on a ladder.
Since my window measures 35 inches throughout (with the vertical trim on all sides), I lower the 1×4 on the similar width (35 inches) and the opposite two at 35.5 inches so they’re longer by 1 / 4 inch on either side.
This provides the window extra dimension and curiosity, as a substitute of the entire trim lining up completely. (You may see this in images beneath.)
A nail gun may be very useful for this undertaking! Nail the 1×2 onto the highest and the skinny lattice to the underside:

As soon as the entire items are secured, you’ll be able to fill holes, caulk and paint earlier than putting in on the window.
I take advantage of a semi-gloss end for all of my door and window trim paint.
Earlier than putting in the brand new topper, I needed to take away the prevailing trim on the prime of the window. To do that, I used a stage to mark a straight line the place I wished to chop.

Be sure that to attain the caulk round this portion earlier than eradicating (identical to the underside apron):

When that half is faraway from the wall, you’ll be able to place the brand new topper proper on prime of the prevailing aspect casing across the window.
After all the things is put in, I love to do a recent bead of caulk across the window and the place the brand new trim is put in. It offers you a extra skilled and completed look!
I discover it simpler to mark the place I would like the caulk with painter’s tape — this provides me an excellent clear line on the wall after I pull the tape away:

They’re known as Turbo Caulk and save your fingers huge time. And once you’re performed, they make an awesome “cap” for the caulk in between tasks.
Here is how this easier window trim seems to be when full:

You possibly can create this same DIY Craftsman trim over doors/walk throughs as nicely:
Should you’re ranging from scratch and have no trim round your window in any respect, you may need to use this subsequent tutorial!
Tutorial #2: Including Craftsman trim to home windows with solely drywall.
This methodology offers you the true, traditional Craftsman window casing, because you’re ranging from scratch.


We had a frigid winter one yr and the window was froze and when it melted into the wall. That space beneath the apron was a giant bubble of water. 😖

Similar to the sooner tutorial, take a crow bar and begin pulling up the wooden.

After I labored on one finish at a time (as a substitute of attempting to drag the entire thing up directly) it helped a bunch. I simply centered on one aspect and acquired that up and away from the drywall, then acquired the entire thing out.


I stored that each one for future tasks. (I used it on all of the wainscoting on this room.)
Additionally, our window sills are deeper so I had to make use of 1×8 wooden as a substitute of the usual 1×5. I adopted Cristina’s directions and used the outdated sill as my information to chop the brand new one.

Right here’s the way it seems to be put in on the window:

I adopted my traced strains with a jigsaw to chop it out. Don’t fear if the strains aren’t good!:

They are going to be largely coated with the brand new casing on all sides of the window.


I simply knock it down somewhat so it would not have such a tough nook, nevertheless it’s not essential.
After changing the sill on the backside, I put in the aspect casings after which I constructed up the highest portion and put in it simply as I did within the first tutorial.
Keep in mind the 1×2 and cease on prime and the brand new sill/stool on the underside will likely be a bit wider than the opposite items.
Here is how this Craftsman molding therapy comes collectively on a window:


I could not BELIEVE how significantly better the room seems to be with the beefier trim across the home windows:

Right here’s a better take a look at how chair rail, wainscoting and window trim work collectively:


I labeled the wooden I used so you’ll be able to pin this for later:

This straightforward trim work round your home windows will take any room to the subsequent stage! It makes such an enormous distinction on home windows and doorways.
You probably have any questions on both tutorial, please let me know within the feedback!