In case you’re consistently adjusting and fixing crooked frames in your partitions, this little repair is for you. 🙂

This publish might include affiliate hyperlinks to your comfort.
I’ll earn a small fee when you make a purchase order by means of hyperlinks.
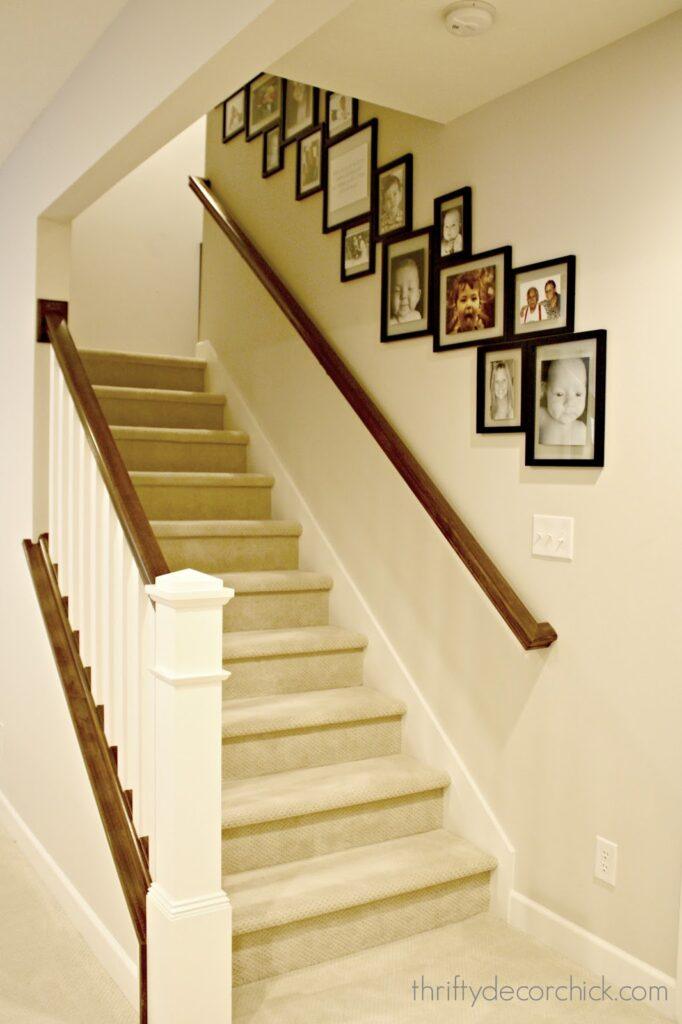
We cherished the look a lot, I needed to proceed it on the alternative wall. Through the years I’ve picked up a couple of of the frames in varied sizes once they go on sale. I lastly began hanging them (that was a much bigger challenge I will share subsequent week!).

That is particularly useful for actually massive paintings or mirrors — if you do not have a protracted degree it is arduous to get the position of the holes good on the wall.
I DO have a protracted degree and nonetheless use this hack! 🙂
In case you’re hanging one thing heavy and there is no stud in that spot, an anchor is a should. It is such a small factor, however I hate drilling for typical anchors — it’s important to discover the correct sized drill bit to match the anchor, then faucet it in with a hammer.
Would not sound like a lot, however once I simply wish to grasp one thing shortly it annoys me. 😂

They’re SO a lot simpler — all you want is a drill or screwdriver to screw them proper into the drywall. There are a variety of choices for various weight capacities as effectively.
The painter’s tape trick I shared above works nice, however most of the time I’ll spend the time to alter a body that has two hangers on the again to a single sawtooth hanger like this one:

Not for tremendous heavy gadgets in fact, however on small frames that is so a lot simpler.
I favor those which you can simply hammer into the again of the body (these teeny tiny nails are a ache), however I had this one in my device stash.
The one drawback with hanging frames with one nail is that they transfer round quite a bit simpler on the wall, particularly in excessive site visitors areas like our staircase.

I’ve additionally used a model that is available in a blue shade. I take advantage of this putty at lot in the course of the holidays for non permanent shows, however this cheesy stuff additionally makes it so frames and mirrors do not transfer round as soon as they’re hung.
A little bit of these things goes a lengthy method. Normally only a small bit is required. I heat it up in my hand to melt it up earlier than utilizing:

I am infamous for simply eyeballing, after which stepping again and realizing artwork is SO crooked. For that purpose, I at all times use a degree for this course of.
If you get the image hanging proper, simply stick somewhat little bit of the putty to the again of the body. It does not matter the place:

Maintaining the extent there, put some mild stress on the body to get the putty good and caught. You then’re completed!
I like to recommend preserving the extent on the artwork throughout this course of as a result of I have been identified to push somewhat too arduous to smush the putty and push it out of degree once more.

I take advantage of this mounting putty on hanging gadgets everywhere in the home, not simply to maintain them degree, however to maintain them from banging throughout once I clear the glass. {By the best way, you will wish to retailer these items in a baggie so it does not dry out.)
Spending a couple of minutes securing your frames and paintings will prevent loads of “adjusting” time later!
This putty is particularly useful on a gallery wall like this the place the frames are tremendous shut, as a result of when one body obtained tousled, all of them appeared off:

You simply want a tiny bit to safe every body, and you may’t see the putty in any respect whenever you’re completed:

For the primary time in eight years, our frames have stayed put and I am not adjusting them each week or so. I do not know why I did not do that earlier!:

This can be a easy useful trick, particularly in a excessive site visitors space or in case you have little youngsters to who like to regulate issues. 🙂 Have you ever tried this mounting putty?