I have been working my method by my method by our house, making fairly and useful updates to makeovers I accomplished years in the past.
Just a few weeks in the past I completed an enormous DIY undertaking within the kitchen…this has develop into one in every of my favourite transformations in a very long time. Now that every one the little particulars are finished, I can lastly share it with you!

This publish could include affiliate hyperlinks in your comfort.
I’ll earn a small fee when you make a purchase order by hyperlinks.
This replace made the entire island look and feel a lot extra substantial.
Over time I used to be craving somewhat extra element — I am all the time making an attempt to melt all the exhausting strains in our kitchen and knew the lengthy horizontal planks and easy design weren’t serving to.
First up, I wanted to take away the shiplap boards on either side of the island. I used a flat blade and tapped it behind each bit like so:

That is why I by no means use wooden glue on my trim initiatives — I modify issues up too usually! 🙂 Eradicating the boards was tremendous fast and simple. I additionally eliminated the underside and facet trim that made up the “body” I had put in across the shiplap. I left the highest half intact since that wasn’t altering that in any respect.
I reused a number of the shiplap I had simply pulled off and nailed them in on the peak of the baseboards all the way in which across the backside — I did not need the brand new trim I used to be putting in to sit down straight on prime of the bottom.
As an alternative I wished the brand new baseboards to return out a simply bit and sit in entrance of the brand new trim:

This may make extra sense in a minute. It is a minor element, however I believe it provides a bit extra dimension ultimately. That scrap pushed the baseboards out a smidge and gave it extra of a reveal in opposition to the brand new therapy I used to be including above.

After the bottom was in, I used to be capable of reattach the perimeters and backside items that made up the body earlier than:

The one huge expense for this undertaking was for the brand new baseboard — fortunately I used to be ready to make use of most of what I already had for the remainder of it! (By the way in which, when did fairly baseboards get so costly??)
After the body trim was reinstalled on the perimeters, I moved on to including extra element on the “legs” I constructed years in the past. I used quite simple (and cheap) lattice from Lowe’s on the entrance and sides of every leg:

Fortunately I had sufficient random cuts of it in my scrap wooden for about half of what I wanted.
You possibly can see why I wished the baseboards to butt out a bit additional — in any other case the trim would have been put in straight on prime of the baseboards and I’d have misplaced a few of that added element.
A fast facet notice — the perimeters of our island did not have a toe kick (the open area under your cupboards) to start out with. Taking your trim straight right down to the ground like this offers cupboards a stunning, customized look that may resemble furnishings.
I’ve observed a pattern currently of making this similar search for ALL of the cupboards in a kitchen, and I’d warn in opposition to that. As fairly because it appears, a toe kick may be very useful. Actually, it is area…in your toes. 😂
With out that open area, you possibly can’t stand at your counter tops comfortably. Ergonomically it is not splendid, particularly whereas working at a range or sink for any prolonged period of time.
Anyway, shifting on!
All I had left to do was add one thing again to the area contained in the “body” on either side of the island. Earlier than, I had the horizontal planks there, however this time I wished a extra conventional look. Fortunately I had some scrap luan already minimize to the proper dimension — this time I put in them vertically.
For the opposite facet, I had a 2×4 piece of luan minimize into strips at Lowe’s. I have not had them minimize down wooden for me in a very long time, and the worker stated they will not make greater than a pair cuts now. He was SO good and provided to chop them for me anyway, however now I do know! I ponder if Residence Depot is similar?

For those who use this skinny wooden, I like to recommend giving the perimeters a very good sanding — they are often tough after being minimize down:

Every thing bought a few coats of the paint match to the remainder of the cupboards (in a wipeable semi-gloss end) when all the updates had been completed.
The gorgeous baseboards and added character on the legs add so far more curiosity to the perimeters of our island!:

I had precisely 41 inches throughout the width inside that body, and the items of luan I used had been about 5 inches thick. I used eight vertical boards throughout, and needed to mess around with the spacing between every one earlier than I nailed them in.
Cash are nice for this — I believe I used 1 / 4 and a penny collectively to area them out this time:

I added the identical trim and baseboards the place wanted on the opposite facet of the island as properly:

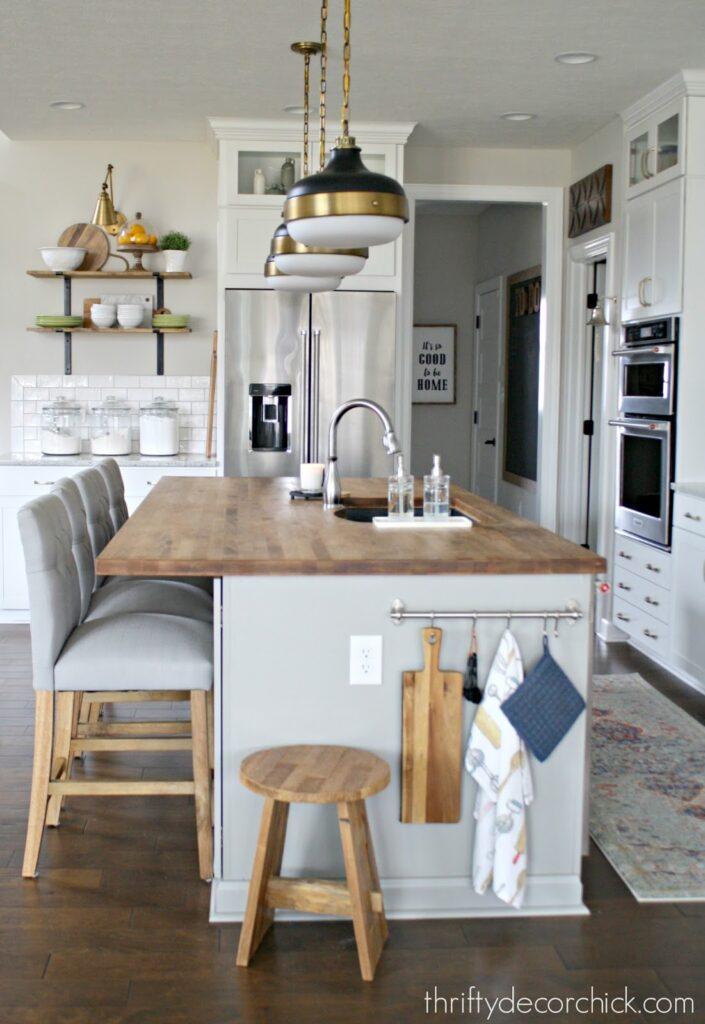
The view from the entrance appears SO significantly better now!:

These fairly baseboards make all of the distinction! All in all, I spent beneath $100 for this new look, together with the cupboard ft.
Here is a reminder of how the perimeters seemed earlier than:

This was positively an enchancment, however with somewhat effort they give the impression of being far more customized and exquisite:

It is a lot extra substantial now and is such a fantastic addition to our kitchen! The curved strains of the bottom add character, however soften the look as properly.
Each variations are nice, simply totally different design types. My first DIY had a extra trendy look, and this newer replace is extra conventional.
I plan on portray our island a hotter, richer shade someday this yr, however for now I used the leftover matching paint I already had.
I am so so thrilled with this transformation! I nonetheless cease and test it out once I stroll by. 🙂 For those who’re in search of an effective way to replace a builder primary kitchen island, these modifications do not value a ton and add a ton of visible curiosity.